

Other Parts
Here is a list of parts we produce for specific versions of Lee Enfields. Currently we offer a number of parts for the SMLE Mark V. This list will be updated for other versions.
If you are interested in something not on our list please do not hesitate to contact us.
Our previously converted SMLE fore-ends have been replaced with new-made, walnut fore-ends.
The Mark V fore-end is unique in that it does not have cut-outs for the rear sight protectors or the hole for the protector fitting screw. There are now no in-fills to be seen and the shape is as per the 1920s Enfield made originals. We understand the Mark V was the last SMLE to have the fuller shaped fore-end. Subsequent production for the Mark III* and spares, was a more streamlined shape.
Our Mark V fore-ends are “in the white” and will require colouring and finishing after fitting. They do not have metal parts fitted.
Fitting these fore-ends requires a high degree of hand skills, not only in the stocking up process, but in fitting the front band.
Rear Sights
Made on NC machines to the original drawings, including the graduations. Hardened on the bearing faces. Pivot pins , ball, spring and cotters supplied. All blacked and ready to go. Indistinguishable from the original, except they look new. It is up to the customer to apply aging marks!
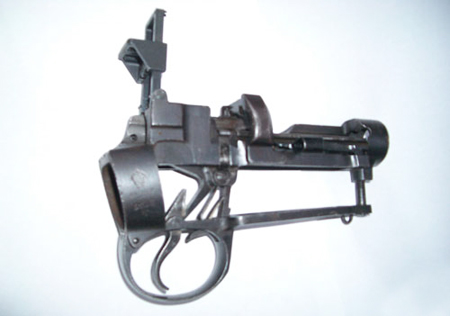
These sights do not have maker's markings, we do not want them passed off as originals. NOTE: the original back sight was far from perfect in its design and these new manufactured sights exhibit all the foibles of the original. However being new-made, the slider does not leap up and down the ladder like a worn out original, so that's a bonus.
Front and Rear Top Hand Guards
Newly made to original drawings. Smooth but unfinished. Ready for staining. Metal parts not included.
Front Bands
Made on NC machines to the original drawing. Blacked and supplied with two screws (one used for fitting, the other for final assembly), both left over-long to accommodate fitting. As the item does not interface with anything else, the thread used is a modern 2BA, instead of the "Enfield Standard" original. This make obtaining spares an easier proposition. Producing the original Enfield thread was uneconomic and unnecessary.
See hints on fitting below.
Other Items Required
Sprung stud to apply upward pressure on the barrel. Fitted to the front fore-end.
Inner band screw, springs and washer. (Inner band itself is a permanent fixture on the barrel.)
A normal SMLE nose cap, preferably an Enfield made one. Nose cap screws.
An SMLE "lower" swivel band, swivel screw and sling swivel.
Piling swivel.
Fitting the Front Band
The original front bands were made to fit pre 1920s woodwork and these new-made ones were made to the same drawing. The later replacement wood items are "fuller" in profile and the bands need fitting to the rifle by letting them into the fore-end and front hand guard. We recommend this is done BEFORE staining and finishing the fore-end and hand guard. (See below).
Technical experience and superior hand-working skills are required.
This can be a nightmare if not done carefully and will result in damage to the band and the screw thread. Do not rush this job, allow plenty of time.
If the nose cap has a thread for a piling swivel screw, this must be drilled out using a 3/16-in clearance drill. It is advantageous if the clearance hole is larger, say .190-in.
Fit the nose cap to the rifle fore-end by adjusting the wood profile. Make sure the nose cap screws fit.
Remove nose cap and fit the top hand guard.
Carefully slide the band down the rifle from the muzzle by gently springing open the band. Do not over stretch the band it will make fitting more difficult.
Fit the nose cap.
Fit nose cap screws.
Pull the band forward over the nose cap. The excess wood can then be gauged.
Scribe around the band to mark its position on the top hand guard and fore-end.
Remove excess wood and refit the band*. Several iterations will be required. The screw hole in the band and nose-cap piling swivel lug must be ALMOST in-line, before attempting the fit the screw. FORCING AND OVER TIGHTENING WILL DISTORT ITEMS AND BEND SCREWS. So long as the band fits snug and the screw is tight, it is good enough.
Finish and stain wood to requirements.
Fit piling swivel, if available.
Cut screw to length, smooth and round off, then blacken the cut end. Do not cut short. Leave at least a diameter proud. It will be difficult, if not impossible, to remove and refit the band if the screw is cut too short.
Extra Tips
Having removed some wood, keep the rifle in its normal upright working position and GENTLY tap down on the front band to ensure it is bedding down in the cut you have made for it. Use plastic or soft wood as a pad on the band. If you must use "G" cramps to apply a bit of side pressure to the band, again use soft packing. DON'T try and use Mole Grips on the band screw lugs to bring them together, they will permanently FUBAR** the band and force the lugs out of alignment. This advice is offered with the benefit of experience!
* Suggested technique: Using a fine dovetail saw cut the wood inside the scribed lines. Then remove some wood with a very sharp chisel. Use the side of a rectangular file to ensure the surfaces are smooth and square.
** Translation = "distort, mangle or generally render useless".
If you are interested in something not on our list please do not hesitate to contact us.
SMLE Mark V Parts
Fore-ends
Our previously converted SMLE fore-ends have been replaced with new-made, walnut fore-ends.
The Mark V fore-end is unique in that it does not have cut-outs for the rear sight protectors or the hole for the protector fitting screw. There are now no in-fills to be seen and the shape is as per the 1920s Enfield made originals. We understand the Mark V was the last SMLE to have the fuller shaped fore-end. Subsequent production for the Mark III* and spares, was a more streamlined shape.
Our Mark V fore-ends are “in the white” and will require colouring and finishing after fitting. They do not have metal parts fitted.
Fitting these fore-ends requires a high degree of hand skills, not only in the stocking up process, but in fitting the front band.
Rear Sights
Made on NC machines to the original drawings, including the graduations. Hardened on the bearing faces. Pivot pins , ball, spring and cotters supplied. All blacked and ready to go. Indistinguishable from the original, except they look new. It is up to the customer to apply aging marks!
These sights do not have maker's markings, we do not want them passed off as originals. NOTE: the original back sight was far from perfect in its design and these new manufactured sights exhibit all the foibles of the original. However being new-made, the slider does not leap up and down the ladder like a worn out original, so that's a bonus.
Front and Rear Top Hand Guards
Newly made to original drawings. Smooth but unfinished. Ready for staining. Metal parts not included.
Front Bands
Made on NC machines to the original drawing. Blacked and supplied with two screws (one used for fitting, the other for final assembly), both left over-long to accommodate fitting. As the item does not interface with anything else, the thread used is a modern 2BA, instead of the "Enfield Standard" original. This make obtaining spares an easier proposition. Producing the original Enfield thread was uneconomic and unnecessary.
See hints on fitting below.
Other Items Required
Sprung stud to apply upward pressure on the barrel. Fitted to the front fore-end.
Inner band screw, springs and washer. (Inner band itself is a permanent fixture on the barrel.)
A normal SMLE nose cap, preferably an Enfield made one. Nose cap screws.
An SMLE "lower" swivel band, swivel screw and sling swivel.
Piling swivel.
Fitting the Front Band
The original front bands were made to fit pre 1920s woodwork and these new-made ones were made to the same drawing. The later replacement wood items are "fuller" in profile and the bands need fitting to the rifle by letting them into the fore-end and front hand guard. We recommend this is done BEFORE staining and finishing the fore-end and hand guard. (See below).
Technical experience and superior hand-working skills are required.
This can be a nightmare if not done carefully and will result in damage to the band and the screw thread. Do not rush this job, allow plenty of time.
If the nose cap has a thread for a piling swivel screw, this must be drilled out using a 3/16-in clearance drill. It is advantageous if the clearance hole is larger, say .190-in.
Fit the nose cap to the rifle fore-end by adjusting the wood profile. Make sure the nose cap screws fit.
Remove nose cap and fit the top hand guard.
Carefully slide the band down the rifle from the muzzle by gently springing open the band. Do not over stretch the band it will make fitting more difficult.
Fit the nose cap.
Fit nose cap screws.
Pull the band forward over the nose cap. The excess wood can then be gauged.
Scribe around the band to mark its position on the top hand guard and fore-end.
Remove excess wood and refit the band*. Several iterations will be required. The screw hole in the band and nose-cap piling swivel lug must be ALMOST in-line, before attempting the fit the screw. FORCING AND OVER TIGHTENING WILL DISTORT ITEMS AND BEND SCREWS. So long as the band fits snug and the screw is tight, it is good enough.
Finish and stain wood to requirements.
Fit piling swivel, if available.
Cut screw to length, smooth and round off, then blacken the cut end. Do not cut short. Leave at least a diameter proud. It will be difficult, if not impossible, to remove and refit the band if the screw is cut too short.
Extra Tips
Having removed some wood, keep the rifle in its normal upright working position and GENTLY tap down on the front band to ensure it is bedding down in the cut you have made for it. Use plastic or soft wood as a pad on the band. If you must use "G" cramps to apply a bit of side pressure to the band, again use soft packing. DON'T try and use Mole Grips on the band screw lugs to bring them together, they will permanently FUBAR** the band and force the lugs out of alignment. This advice is offered with the benefit of experience!
* Suggested technique: Using a fine dovetail saw cut the wood inside the scribed lines. Then remove some wood with a very sharp chisel. Use the side of a rectangular file to ensure the surfaces are smooth and square.
** Translation = "distort, mangle or generally render useless".